Enable and Use Testlify's Proctoring Features
Testlify provides 12 proctoring features to keep your assessments secure and fair. This guide explains how to enable each one and review the resulting logs.
Before you begin
- You must have Admin or Assessment Manager access in your Testlify workspace.
- Proctoring settings are configured per assessment. Open the target assessment, click Edit, and go to the Proctoring tab to access all options below.
- Features 8 (Image Identification) and 11 (Photo ID Verification) carry per-attempt charges — confirm billing details with your account owner before enabling them.
1. Full Screen Mode
Standard Full Screen Mode launches the assessment in full screen but allows candidates to exit without penalty. Force Full Screen Mode locks candidates to full screen and flags or terminates the session on exit.
How to enable Full Screen Mode
- Open the assessment, click Edit, and go to the Proctoring tab.
- Toggle Full Screen Mode on. To strictly enforce it, also enable Force Full Screen Mode.
- Set a violation limit — the assessment terminates when a candidate exceeds this number of exits.
- Click Save.
How it works: Candidates receive a notice before the assessment that full screen is required. Each time they exit full screen, an on-screen prompt appears to return. Each exit counts as one violation; reaching the limit terminates the assessment.
How to view Full Screen violation logs
- Open the Candidate Report page.
- Scroll to the Proctoring section and click View Logs under Full Screen Violations.


2. Tab Proctoring
Tab Proctoring detects and logs every time a candidate switches away from the assessment tab.
How to enable Tab Proctoring
- Open the assessment, click Edit, and go to the Proctoring tab.
- Enable Tab Proctoring.
- Set violation limits to trigger warnings or auto-termination.
- Click Save. All tab switches are logged for review.

3. Snapshot Proctoring
Snapshot Proctoring captures periodic photos of the candidate via their webcam throughout the assessment.
How to enable Snapshot Proctoring
- Open the assessment, click Edit, and go to the Proctoring tab.
- Enable Snapshot Proctoring.
- Adjust the snapshot interval as needed (default: every 120 seconds).
- Click Save.
How to review snapshots
Go to the Candidate Display page and scroll to the Proctoring section to view all captured snapshots.


Tip: Pair Snapshot Proctoring with Image Identification (feature 8) to automatically flag photos where a different or absent face is detected.
4. Copy-Paste Tracking
Copy-Paste Tracking detects when candidates copy or paste text during coding questions, preventing use of external sources.
How to enable Copy-Paste Tracking
- Open the assessment, click Edit, and go to the Proctoring tab.
- Check the box next to Copy-Paste Tracking.
- Set a violation limit and optionally enable auto-termination when the limit is exceeded.
- Click Save.
How to review copy-paste activity
- Go to the Candidate Display page.
- Scroll to the Trust Insights section to see a full record of copy-paste events.


5. Mouse Out Tracking
Mouse Out Tracking flags every instance where the candidate's mouse cursor leaves the assessment window, indicating possible distraction or external assistance.
How to enable Mouse Out Tracking
- Open the assessment, click Edit, and go to the Proctoring tab.
- Enable Mouse Out Tracking and set a tolerance limit (in seconds) before a violation is recorded.
- Click Save.
How to view Mouse Out logs
- Open the candidate's result page.
- Scroll to the Proctoring section and click View Logs under Mouse Out Violations.


6. Location Tracking
Location Tracking records a candidate's geographic location during the assessment to confirm they are taking it from an approved region.
How to enable Location Tracking
- Open the assessment, click Edit, and go to the Proctoring tab.
- Check the box next to Location Tracking.
- Click Save.
Note: If a candidate uses a VPN, the location report shows the VPN server's location, not their actual location.


7. Question-Level Activity Logs
Question-Level Activity Logs show how long a candidate spent on each question and flag suspicious behavior such as extended inactivity or mid-question tab switches.
How to enable Question-Level Activity Logs
- Open the assessment, click Edit, and go to the Proctoring tab.
- Check Question-Level Activity Logs to enable it (uncheck to disable).
- Click Save.
How to view Question-Level Activity Logs
- Open the assessment and go to Candidate Results.
- Scroll to the Proctoring section and click View Logs to access per-question activity data.


Advanced Add-ons
The following features carry per-attempt charges. Enable them under Assessment Settings > Proctoring after confirming billing details with your account owner.
8. Image Identification ($5 per attempt)
Image Identification continuously monitors the candidate's face via webcam to verify identity and detect impersonation in real time.
How to enable Image Identification
- Open the assessment and go to Assessment Settings > Proctoring.
- Enable Image Identification.
- Set a violation limit — the assessment auto-terminates when the limit is reached.
- Click Save.
How it works
- Snapshot Capture: The system photographs the candidate at the start and at regular intervals.
- Face Detection: Flags instances where no face is detected, a different face appears, or multiple faces are visible.
- Violation Handling: Flagged events accumulate; reaching the limit automatically terminates the assessment.
Tip: Enable Image Identification alongside Snapshot Proctoring (feature 3) for the most comprehensive identity verification coverage.


9. Screen Sharing Proctoring
Screen Sharing Proctoring requires candidates to share their full desktop screen, giving you a complete view of their activity during the test. Screen-share recordings are saved to the candidate's report for post-assessment review.
How to enable Screen Sharing Proctoring
- Open the assessment and go to Assessment Settings > Proctoring.
- Select Make screen sharing mandatory.
- Click Save.
Candidate screen-sharing flow
- Before the assessment starts, the candidate is prompted to share their screen.
- They click Start Sharing.
- They select Entire Screen and enable system audio sharing.
- A notification confirms that sharing is active. If sharing stops, candidates are prompted to resume.
- After the assessment, screen-sharing recordings appear in the candidate's report.


10. Talking Prohibition
Talking Prohibition uses the candidate's microphone to detect verbal communication during the assessment and log each instance with a timestamp.
How to enable Talking Prohibition
- Open the assessment and go to Assessment Settings > Proctoring.
- Enable Talking Prohibition.
- Click Save.
How it works
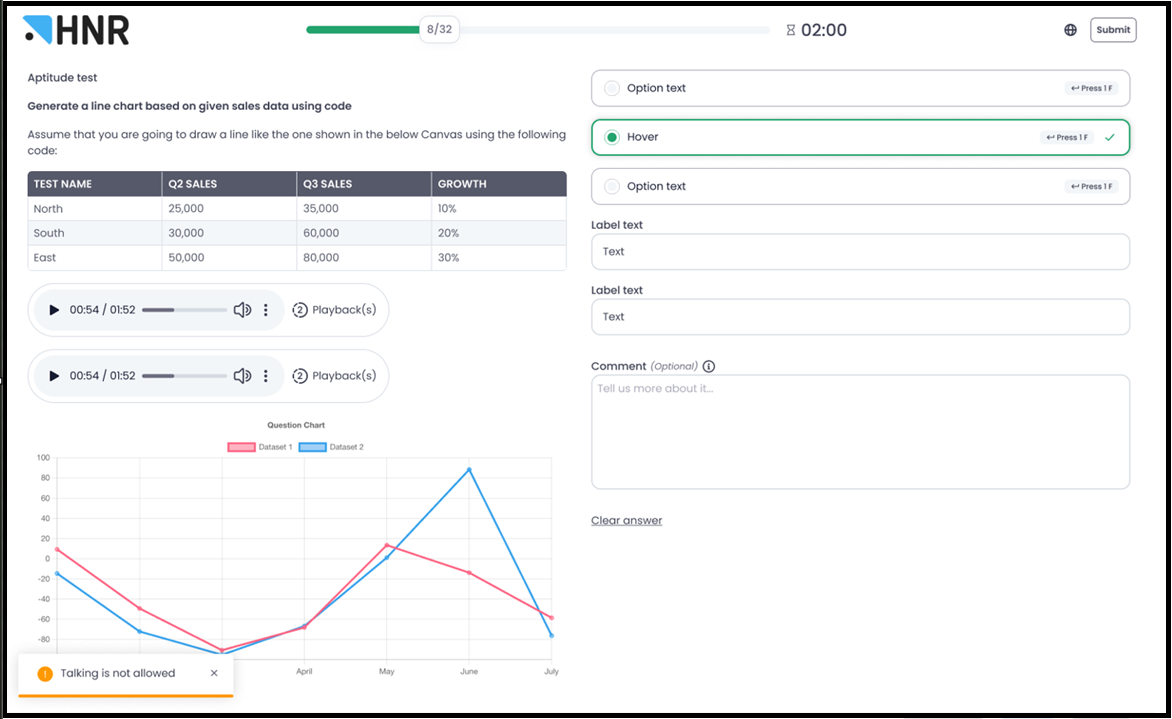
- When voice activity is detected, a toast notification appears on the candidate's screen: "Talking is not allowed."
- Each instance is logged under Proctoring on the Candidate Display page with a timestamp and the message "Voice intervention detected."
- Detects noise from nearby electronic devices in addition to human speech.
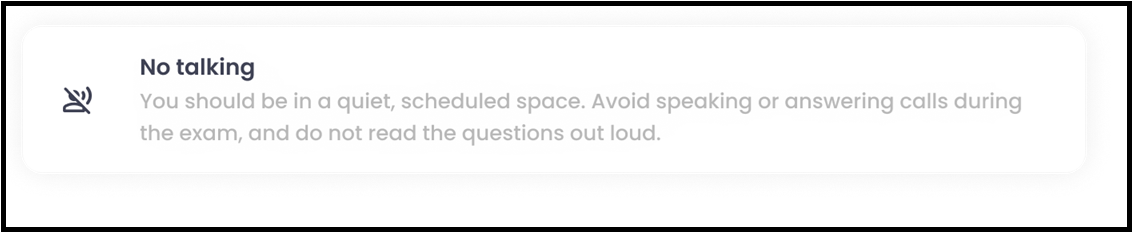
Where it appears
- Candidate Portal — Instructions Page: A "No talking" card is displayed before the assessment begins.
- Candidate Portal — Question Page: Toast notification appears when talking is detected.
- Employer Portal — Assessment Settings > Proctoring: Toggle to enable or disable Talking Prohibition.

- Candidate Display Page (CDP) — Log: All flagged instances are recorded with timestamps.


11. Photo ID Verification ($0.50 per attempt)
Photo ID Verification requires candidates to photograph and upload a valid government-issued ID before starting the test.
How to enable Photo ID Verification
- Open the assessment and go to Settings > Proctoring.
- Enable Photo ID Verification.
- Click Save.
Candidate experience
After the Face Detection step, candidates are prompted to photograph and upload their ID before proceeding to the assessment.
Reviewing uploaded IDs
Uploaded IDs are viewable under the Proctoring tab on the Candidate Display page.


12. Live Environment Check
Live Environment Check uses a candidate's mobile device as a second camera to capture a side or over-the-shoulder view of their physical environment during the test.
How to enable Live Environment Check
- Open the assessment and go to Assessment Settings > Proctoring > Custom.
- Enable Live Environment Check alongside Snapshot Proctoring.
- Click Save.
Candidate experience
- Before the assessment, candidates are prompted to connect a mobile device as a second camera.
- The mobile device records a continuous side view until the assessment ends.
- Important: If the candidate disconnects the mobile device early, the event is reported to the test administrator.

Tip: Combine Live Environment Check with Snapshot Proctoring for maximum coverage — webcam snapshots plus a wide-angle mobile view of the candidate's physical surroundings.
Need help? Contact support.