Testlify Product FAQs
This article will cover all product-related FAQs and is relevant to all Testlify account users.
Assessment
- Create
- Edit
- Make a copy
- Delete Archive/Unarchive
- Invite Candidates
Workspace Account
Candidate
Assessment
1. How do I create an assessment?
From the Assessment Tab:
Click Create New Assessment

Add Job Role and Assessment Name

Select Tests

Add Questions (custom questions)

Review & Configure Settings

Invite candidates to take the assessment

2. How can I edit an assessment?
You can do this easily from your workspace dashboard.
If you are not satisfied with the assessment or would like to make changes, you can do it anytime. However please ensure to always save the changes once done. Also the new changes would reflect only to newly invited candidates and not to those previously invited (before the edits were made).
Here's how you can edit your assessment:
- Access the Assessments Tab and locate the specific assessment you want to edit. You can do this by highlighting the assessment and clicking on the three dots icon.
- From the drop-down list that appears, select the "Edit" option. This will allow you to make changes to the assessment.
Click Edit Option

Edit Job Role and Assessment Name (if required) and click Next

Editable version of the assessment is displayed

3. How can I Make a copy of an assessment?
The 'Make a copy' feature allows you to create a clone of an existing assessment. The tests you previously selected will be carried over. Your custom questions will also be copied, along with any advanced settings you have applied. You can then proceed to edit the assessment as needed or begin inviting candidates to take it.
- From the Assessments tab, locate the desired assessment and click on the three dots icon. Select the 'Make a copy' option from the drop-down list.
- A copy of the assessment will appear at the top of the assessment list with the name Copy of {assessment name}.
Click the Make a Copy option

Edit Assessment Name (if required) and click Make a copy

A copy of the assessment is created

4. How can I delete an assessment?
You can delete an assessment before inviting candidates to take it.
- From the Assessments tab, locate the desired assessment and click on the three dots icon. Select the 'Delete' option from the drop-down list.
- The Assessment will be permanently deleted.
Click Delete option

Delete warning message displayed

Click Delete to permanently delete the Assessment

Please Note: Once you invite candidates, you can only Archive an assessment but cannot delete it.
- From the Assessments tab, locate the desired assessment and click on the three dots icon. Select the 'Archive' option from the drop-down list.
- A pop-up will display with 'You are about to archive this assessment' along with other cautionary information.
- Click 'Archive'. A message will appear at the bottom of the screen mentioning that the Assessment has been successfully archived.
Click Archive option

Archive warning message displayed

Click Archive for assessment to be archived

5. How can I unarchive an assessment?
- From the Assessments tab, above the list of assessments, in a text box 'Active Assessments' will be displayed, click on that and select 'Archived Assessments' from the drop-down list.
- The archive assessment will be displayed. Click on the three dots icon and select 'Unarchive' option from the drop-down list.
Click text box to go to Archived Assessments

Archived assessment displayed

Click Unarchive

Assessment Unarchived

6.How can I invite candidates to an assessment?
You have three options to invite candidates to your assessment:
- Email: You can invite candidates individually or in bulk by uploading a CSV file.
- Public link: Include a link to your assessment in your job post. This allows candidates to directly access and invite themselves to the assessment, eliminating the need to individually invite candidates and saving you valuable time.
- ATS Integration: If you are utilizing one of the applicant tracking systems that we have integrated with, you can connect it to Testlify. This integration streamlines your process, making it more efficient and seamless.
Individual Email Invite
Click Invite Candidates, enter candidate details, and click Invite
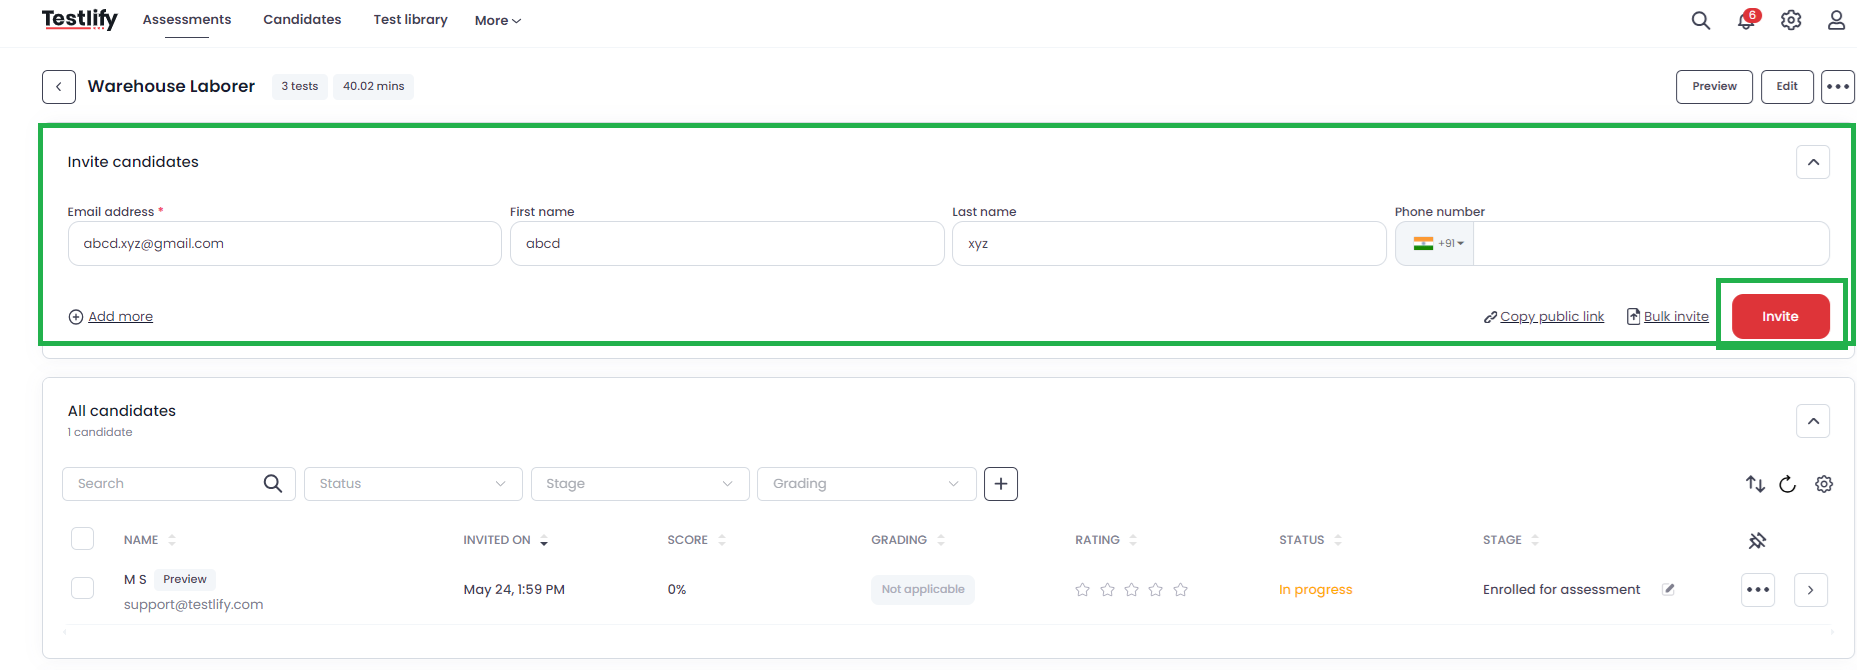
Individual invite sent successfully

Bulk Invite
Invite Bulk Candidates

Generate & Copy Public Link


Import Bulk Candidate via CSV

Invites via CSV successfully sent

Workspace Account
1.What is the difference between Admin and Member permissions?
While Admins and Members do have similar access rights, only an admin can deactivate a team member's access to the workspace. This is the main difference between the role of an Admin and a Member. Though a Member can add another teammate to the workspace he/she cannot deactivate a person's access.
2.How can I add a team member to my workspace?
- From your workspace account, under the profile icon, click 'Settings'
- Click 'Users' and click on the 'Add Member' button
- Enter the team member's email ID and select his/her role from the drop-down list (Admin/Member)
- Click 'Add Member' to save the changes. Your team member will be added to the workspace.
Workspace Settings

Go to Users

Click the Add button

Enter team member's email ID and select the role from the drop-down list

Invitation sent for team member to be added to your workspace

3. How can I remove a team member from my workspace?
- From your workspace account, under the profile icon, click 'Settings'
- Click 'Users' and go to the team member's name and click on the three dots icon
- Select 'Deactivate' from the drop-down list
- Click 'Confirm' for the team member to be removed from your workspace
Workspace Settings
Under 'Users', go to the team member's name & select 'Deactivate'

Click 'Confirm'

Team member removed from your workspace

- How can I download invoices from my workspace?
Here's how you can do it:
- From your workspace dashboard, under the Profile icon click Billing & Invoices

Click 'Manage Subscription' button

- Go to 'Billing History'

- Easily download the invoices

Candidate
1. How can I delete a candidate's details?
In certain situations, it may be necessary to remove a candidate from your assessment for various reasons. It could be due to an error in entering their name or email address or if you want to reinvite them to the same assessment.
- From your workspace dashboard, under the Assessment tab (top left) click on Assessment Name
- The page will open with the candidate's details
- At the end of the candidate name panel, click on the three dots icon and select 'Delete'
- The candidate's details will get deleted
Please Note: Deletion is an irreversible action, and the information cannot be recovered once deleted. It is important to ensure that you have retrieved all necessary data from the results before proceeding with deleting the candidate details.
Click on the three dots icon and select 'Delete'

To confirm your action click 'Delete' again

Candidate details will be deleted from your workspace

2. Can I reinvite the candidate to the same assessment?
Reinviting candidates to the same assessment is not possible. If a candidate needs to redo a specific part of the assessment or retake the assessment, they will be required to begin the entire assessment again. To initiate this process, you must first delete the candidate's details. Subsequently, you can send them a new assessment invite.
Please Note: When the candidate retakes the assessment, they will encounter the same questions they had previously answered. This factor can potentially impact their results. We suggest that you download the candidate's original results prior to deleting them from the assessment.
3. How can I send the candidate's results?
You can send the results either individually or using the bulk option
Here's how you can do this:
Individually
- Under the Assessment tab, go to the specific assessment and at the end of the candidate name panel, click on the three dots icon and select 'Send assessment result'
- The assessment results will be sent out to that candidate.
Bulk
- Under the Assessment tab, go to the specific assessment and select (check box) the list of candidates for whom you want to send the results (you can select a maximum of 10 candidates from the list)
- Click on the 'Send Assessment Result' icon (email icon) that appears on the panel just above the candidate details.
- The assessment results will be sent out to all the selected candidates.
Please Note: Results will be sent only to candidates who have completed the assessment.