
Integrating Testlify with Avionté
TESTLIFY HELP CENTER
Integrating Testlify with Avionté
A step-by-step guide to connecting your Avionté ATS account, automatically triggering assessments from a job stage, and syncing results back to the candidate record.
Audience: Testlify clients using Avionté as their ATS
Estimated setup time: 15–20 minutes (one-time)
Overview
The Testlify–Avionté integration lets you send skills assessments to candidates without leaving Avionté. Once connected, moving a candidate into a designated “assessment” stage on a job automatically triggers a Testlify invite. When the candidate finishes, their score, completion time, and a full PDF report are logged straight back onto the candidate's Avionté profile.
This guide covers the full workflow in the order you'll actually do it:
- Connecting your Avionté account to Testlify
- Creating a dedicated “Testlify Assessment” stage in Avionté (one-time setup)
- Creating and posting a job in Avionté
- Linking that job to a Testlify assessment
- Nominating a candidate and triggering the assessment
- Reviewing results once the candidate completes it
Note: You'll need admin access in both Avionté and Testlify to complete the connection steps. Day-to-day use (nominating candidates, changing stages) can be done by any recruiter with standard Avionté permissions.
What you'll need before you start
| You'll need | Where to find it |
| Avionté Tenant name | Avionté admin panel — API / integrations settings |
| Avionté Client ID & Client Secret | Avionté admin panel — API key page (linked from the Testlify connection screen) |
| Testlify admin login | app.testlify.com — Settings → Integrations |
| Avionté admin/back-office login | To create the custom nominate stage and post jobs |
Part 1 — Connect Avionté to Testlify
Start by authorizing Testlify to talk to your Avionté account. This is a one-time setup performed by an admin.
- In Testlify, go to Settings → Integrations.
- Find Avionté in the integrations list and select it to begin linking.
-
On the connection screen, enter your Avionté Tenant, Client ID, and Client Secret. Testlify links directly to where you can find your API key if you don't have it handy.
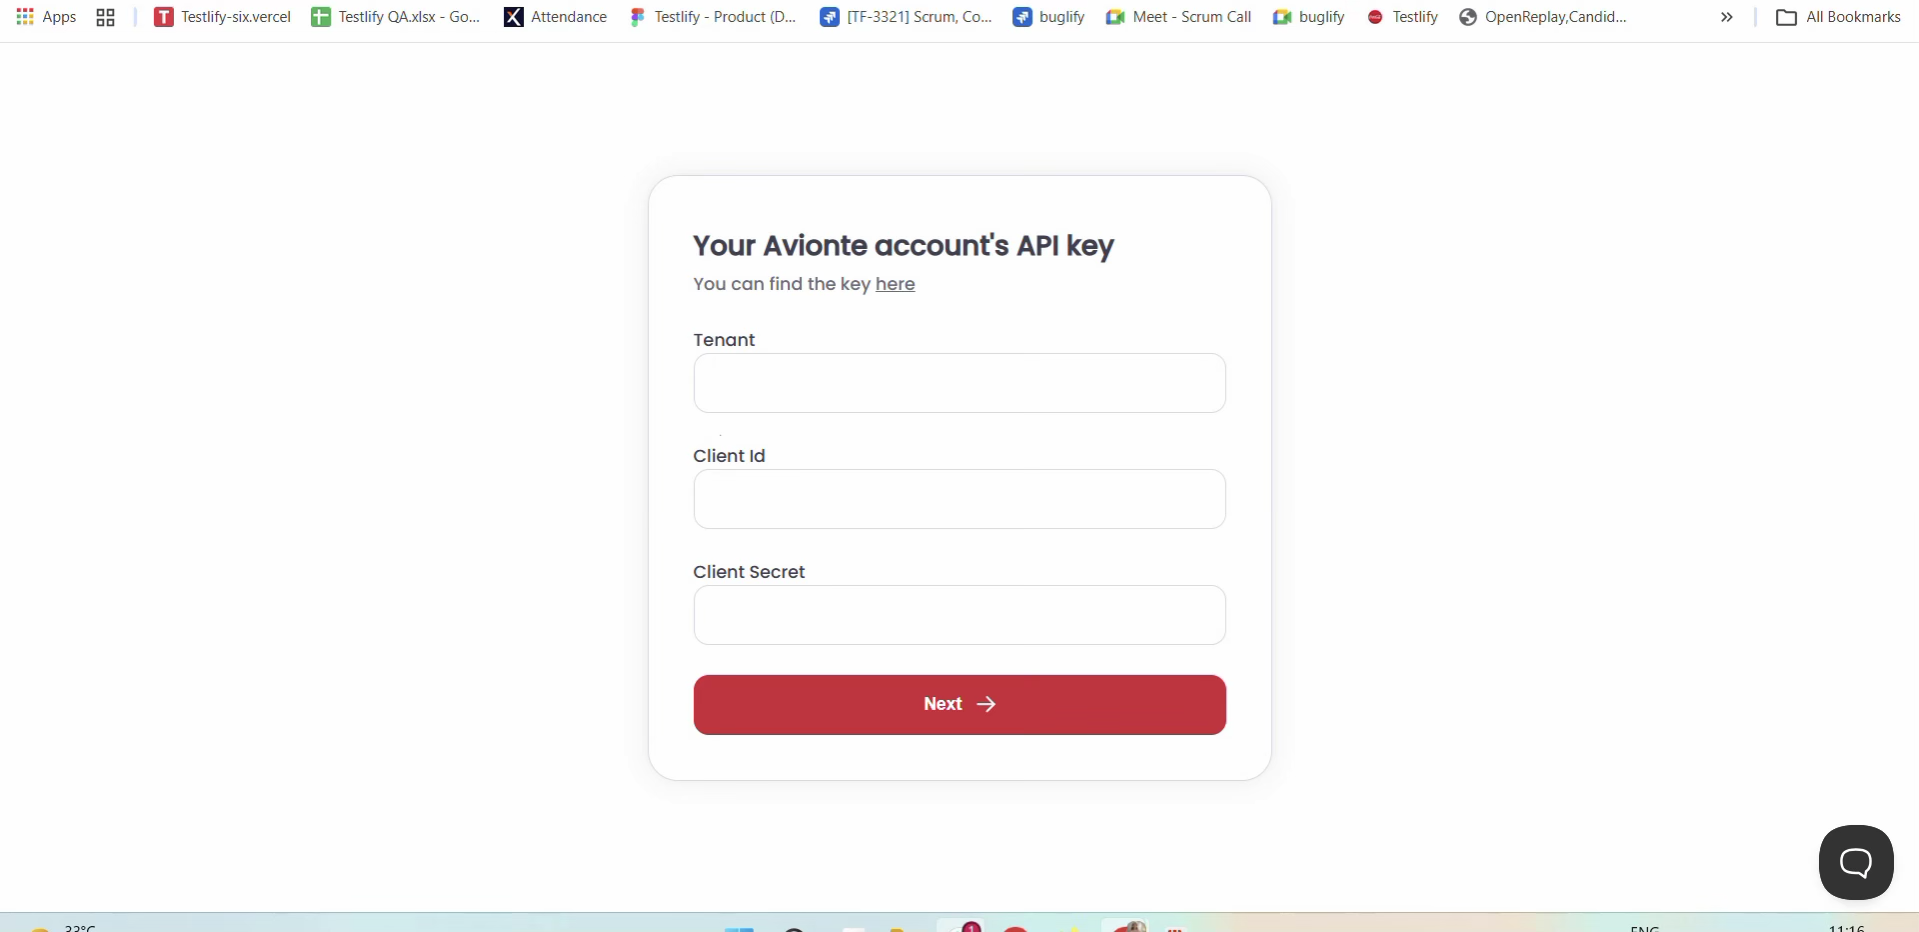
Enter your Avionté Tenant, Client ID, and Client Secret, then click Next.
- Click Next. Testlify validates the credentials and connects to your workspace.
- You'll see a confirmation screen — click Continue.

Confirmation that Avionté is now connected to your Testlify workspace.
Note: The confirmation screen reminds you to also complete a few steps on the Avionté side — that's Part 2 below.
To verify the connection at any time, go to Settings → Integrations in Testlify. Avionté should appear in your integrations list with a status of Active.
Part 2 — Create a “Testlify Assessment” Stage in Avionté
Testlify sends an assessment automatically when a candidate is moved into a specific nominate stage in Avionté. This stage doesn't exist by default, so you'll create it once.
- In Avionté, go to Back Office → Table Editor → Nominate Stages.
- Add a New Item — name it clearly, e.g. “Testlify Assessment,” choose an appropriate Item Type (Interview or General both work), and click Add.

Back Office → Table Editor → Nominate Stages — the list of stages candidates can move through.
Note: This stage name is what you'll select as the “Invitation stage” when linking a job in Part 4. Use a name your recruiting team will recognize at a glance.
Part 3 — Create and Post a Job in Avionté
If the job you're hiring for doesn't already exist in Avionté, create and post it. If it already exists, skip to Part 4.
- Go to Jobs → Add New Job.
-
Fill in Client Information — company, manager, company office, and billing contact.
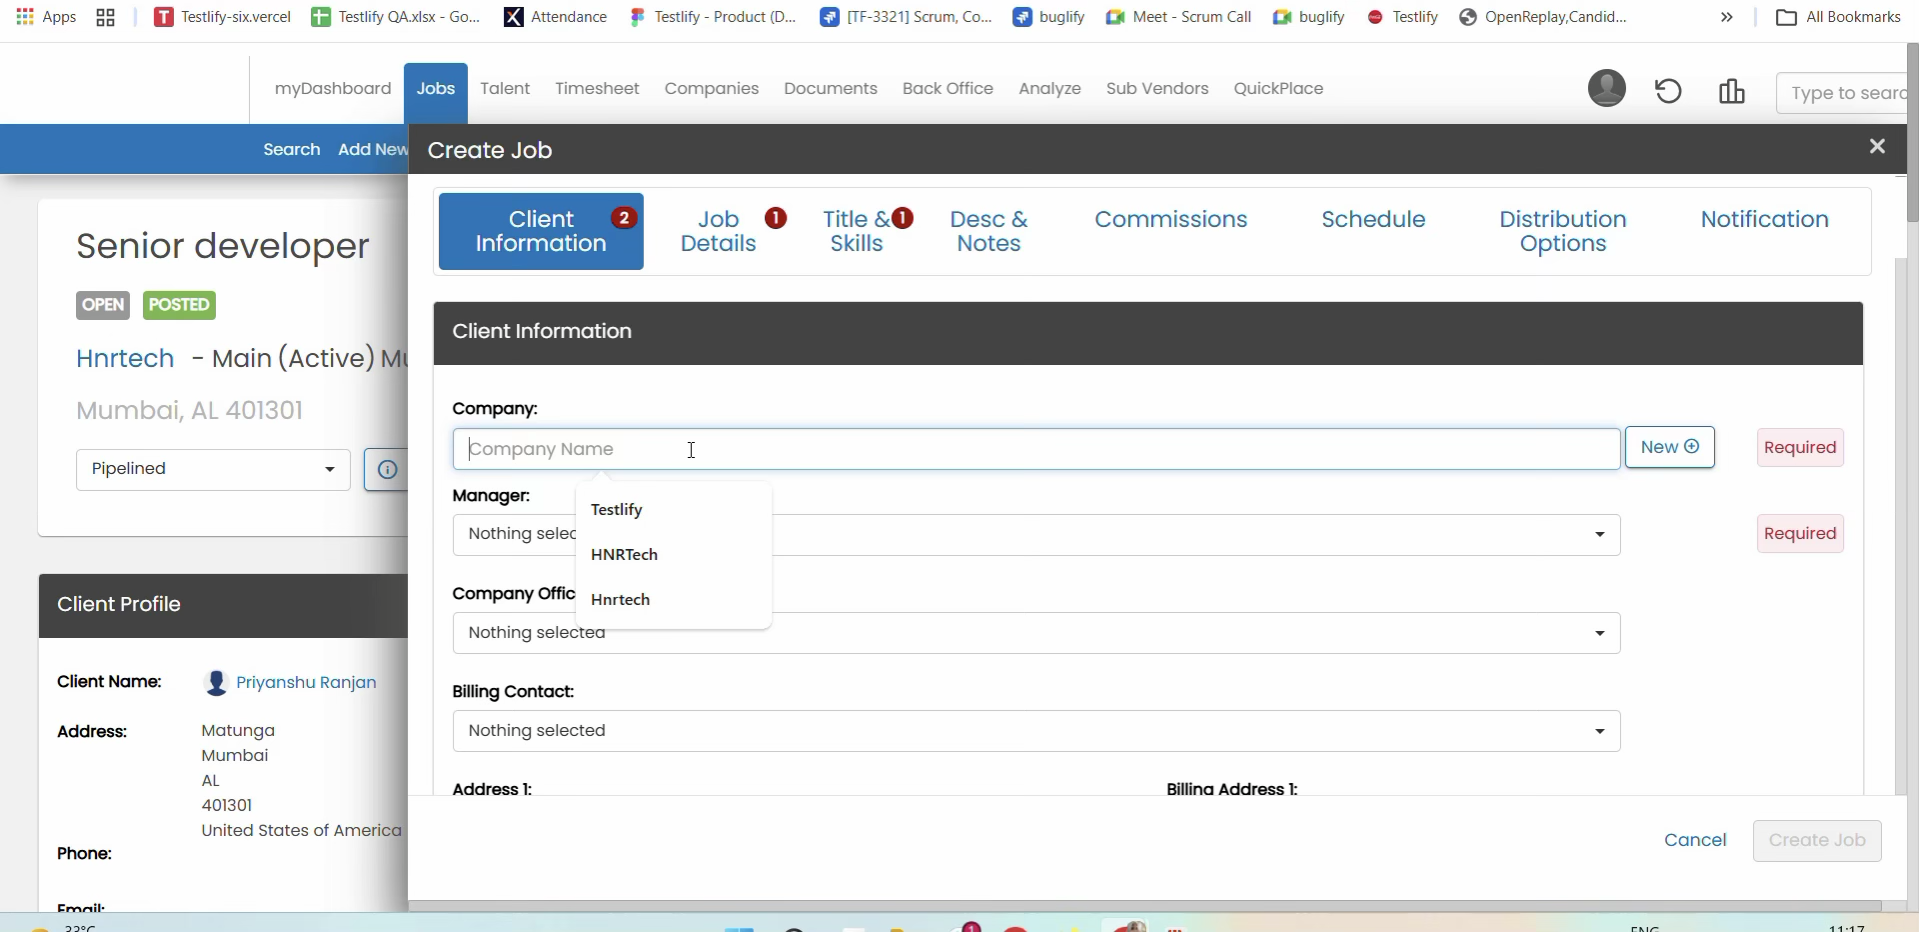
Create Job — Client Information tab.
-
Complete the Job Details and Title & Skills tabs (position title, worksite address, etc.).
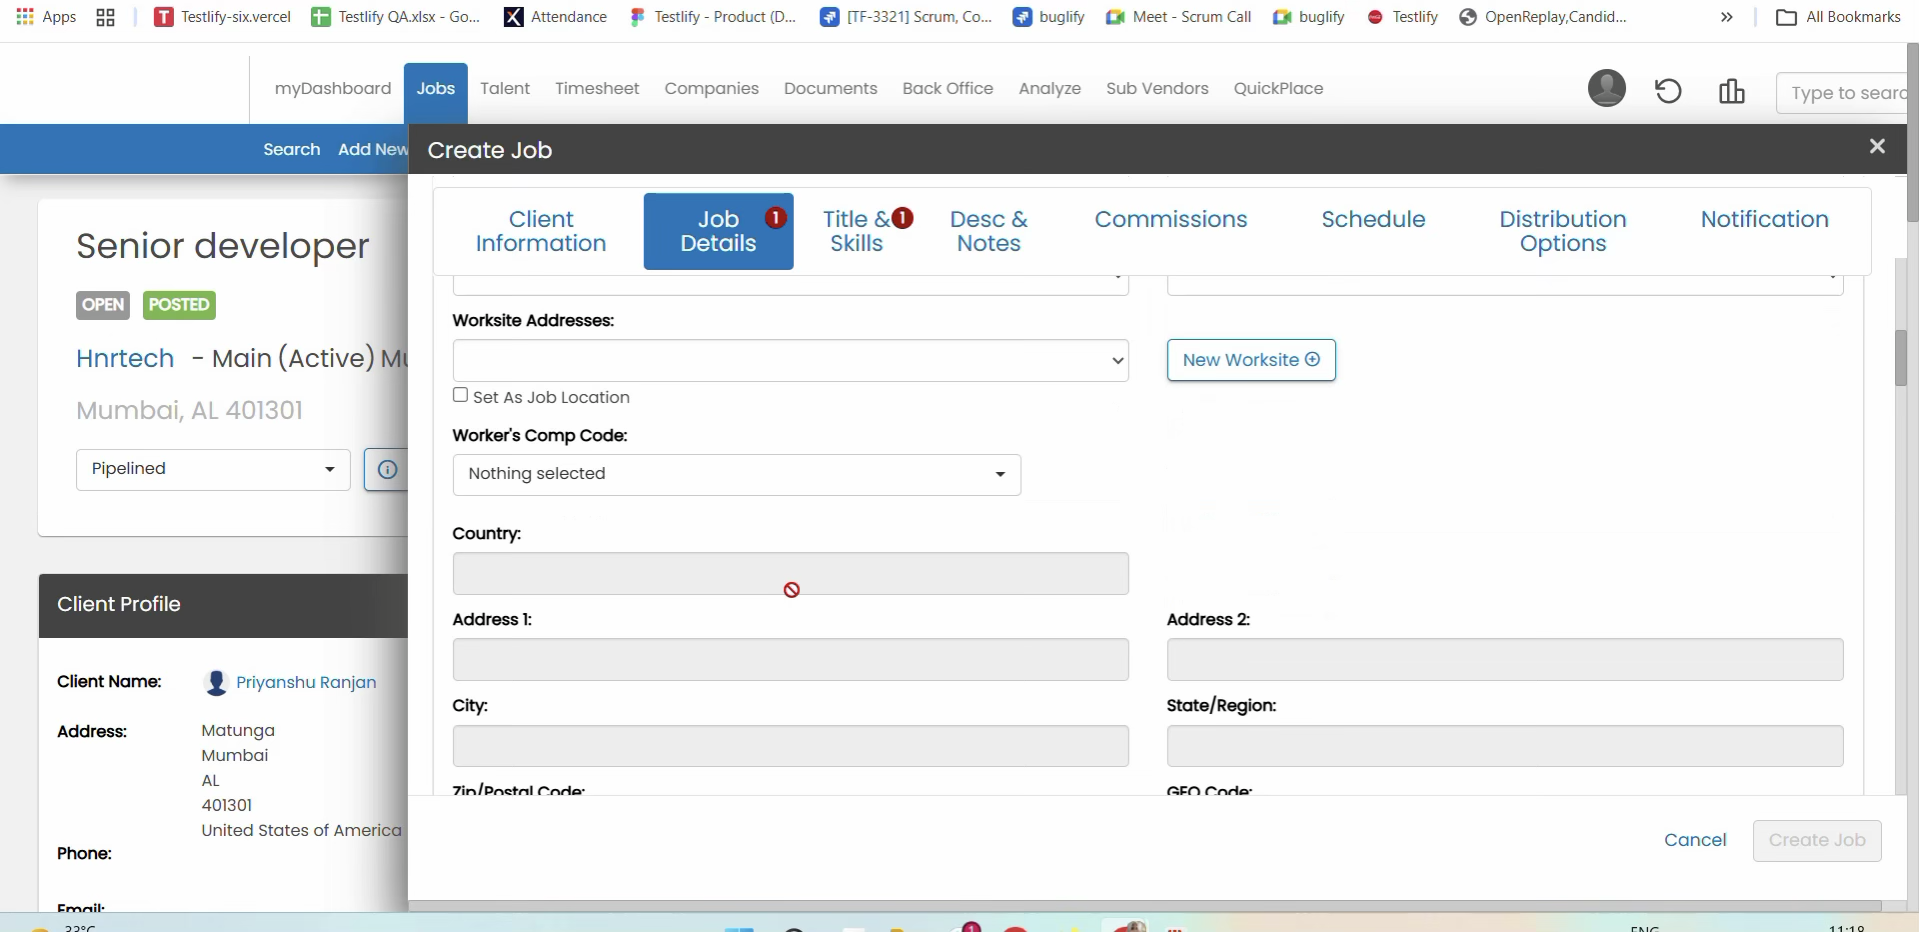
Create Job — Job Details tab.
- Click Create Job, then add a job description and click Post Job under External Job Staging.
-
Once posted, note the Job ID shown on the job's overview page — you'll need it in Part 4.
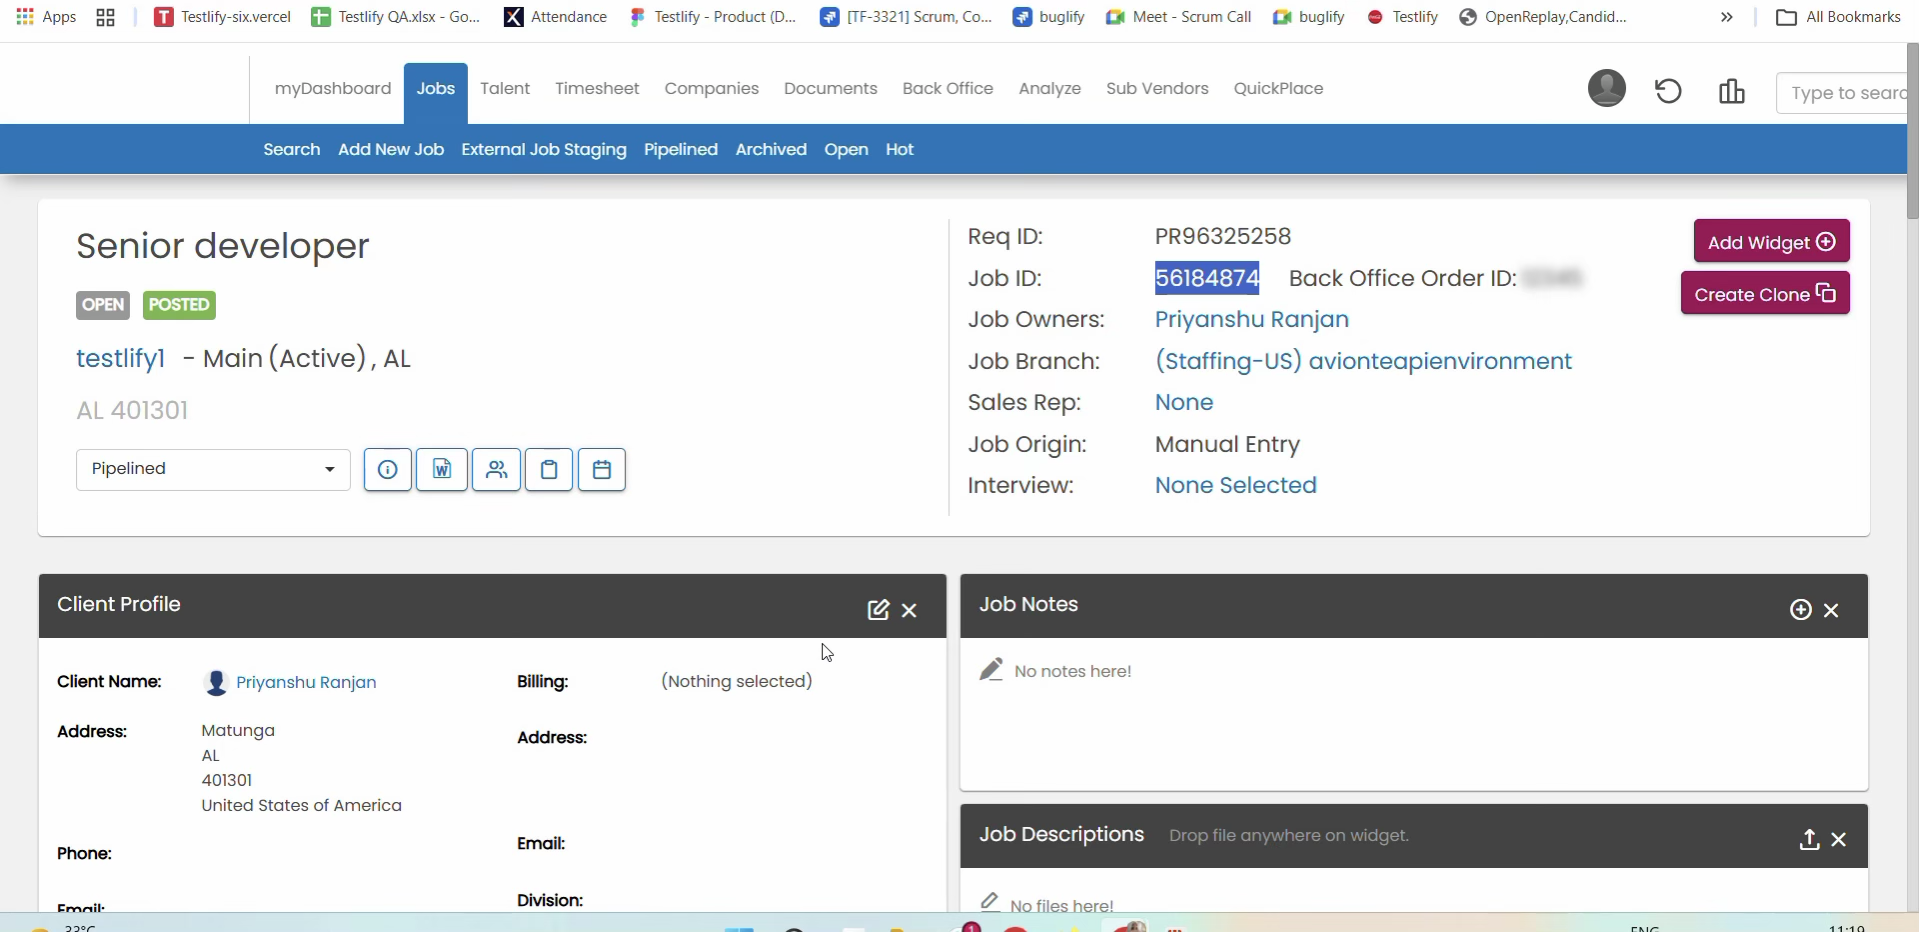
The job is now Open and Posted. The Job ID is shown at the top right.
Part 4 — Link the Job to a Testlify Assessment
This step tells Testlify which Avionté job and which candidate stage should trigger a specific assessment.
- In Testlify, open (or create) the assessment you want to use for this role, then go to its Settings → Integration tab.
- Click Link integration.
-
Under ATS, select Avionté.
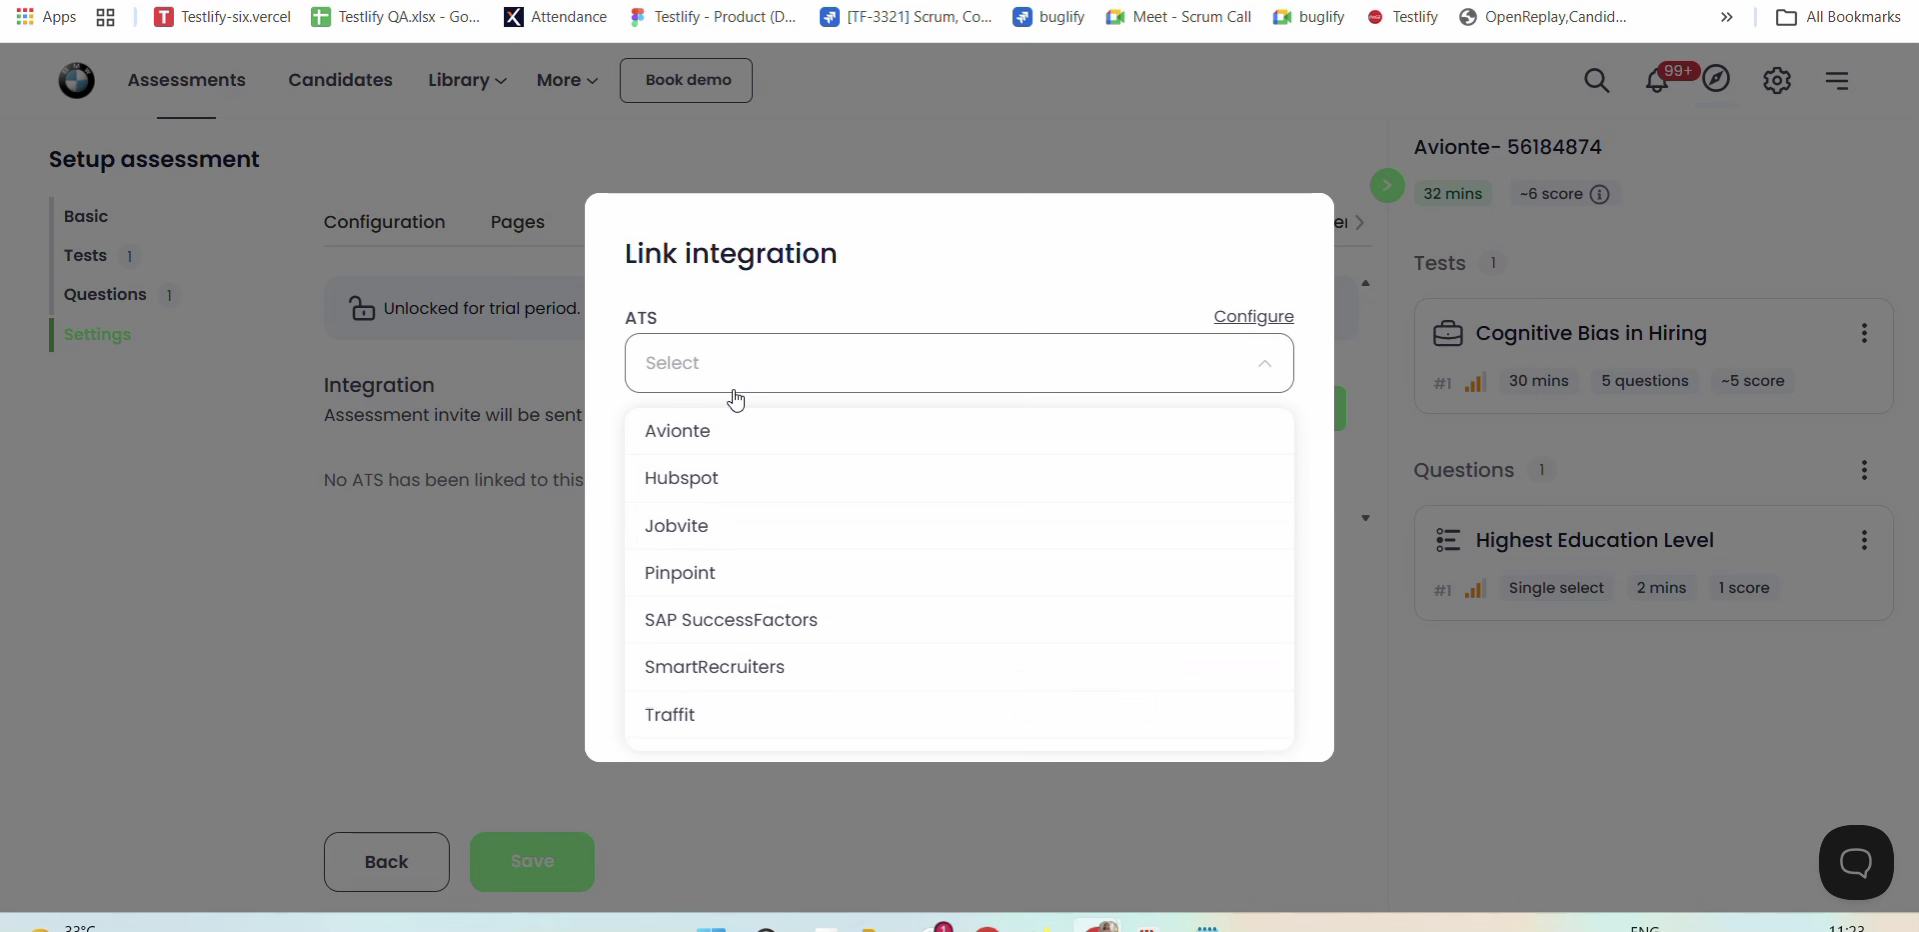
Link integration — choose Avionté from the list of supported ATS platforms.
- Under Job profile, select the corresponding Avionté job (shown as “[Job Title]-[Job ID]”).
- Under Invitation stage, select the custom stage you created in Part 2 (e.g. Testlify Assessment).
-
Click Link. You'll see a confirmation that the assessment was updated successfully.
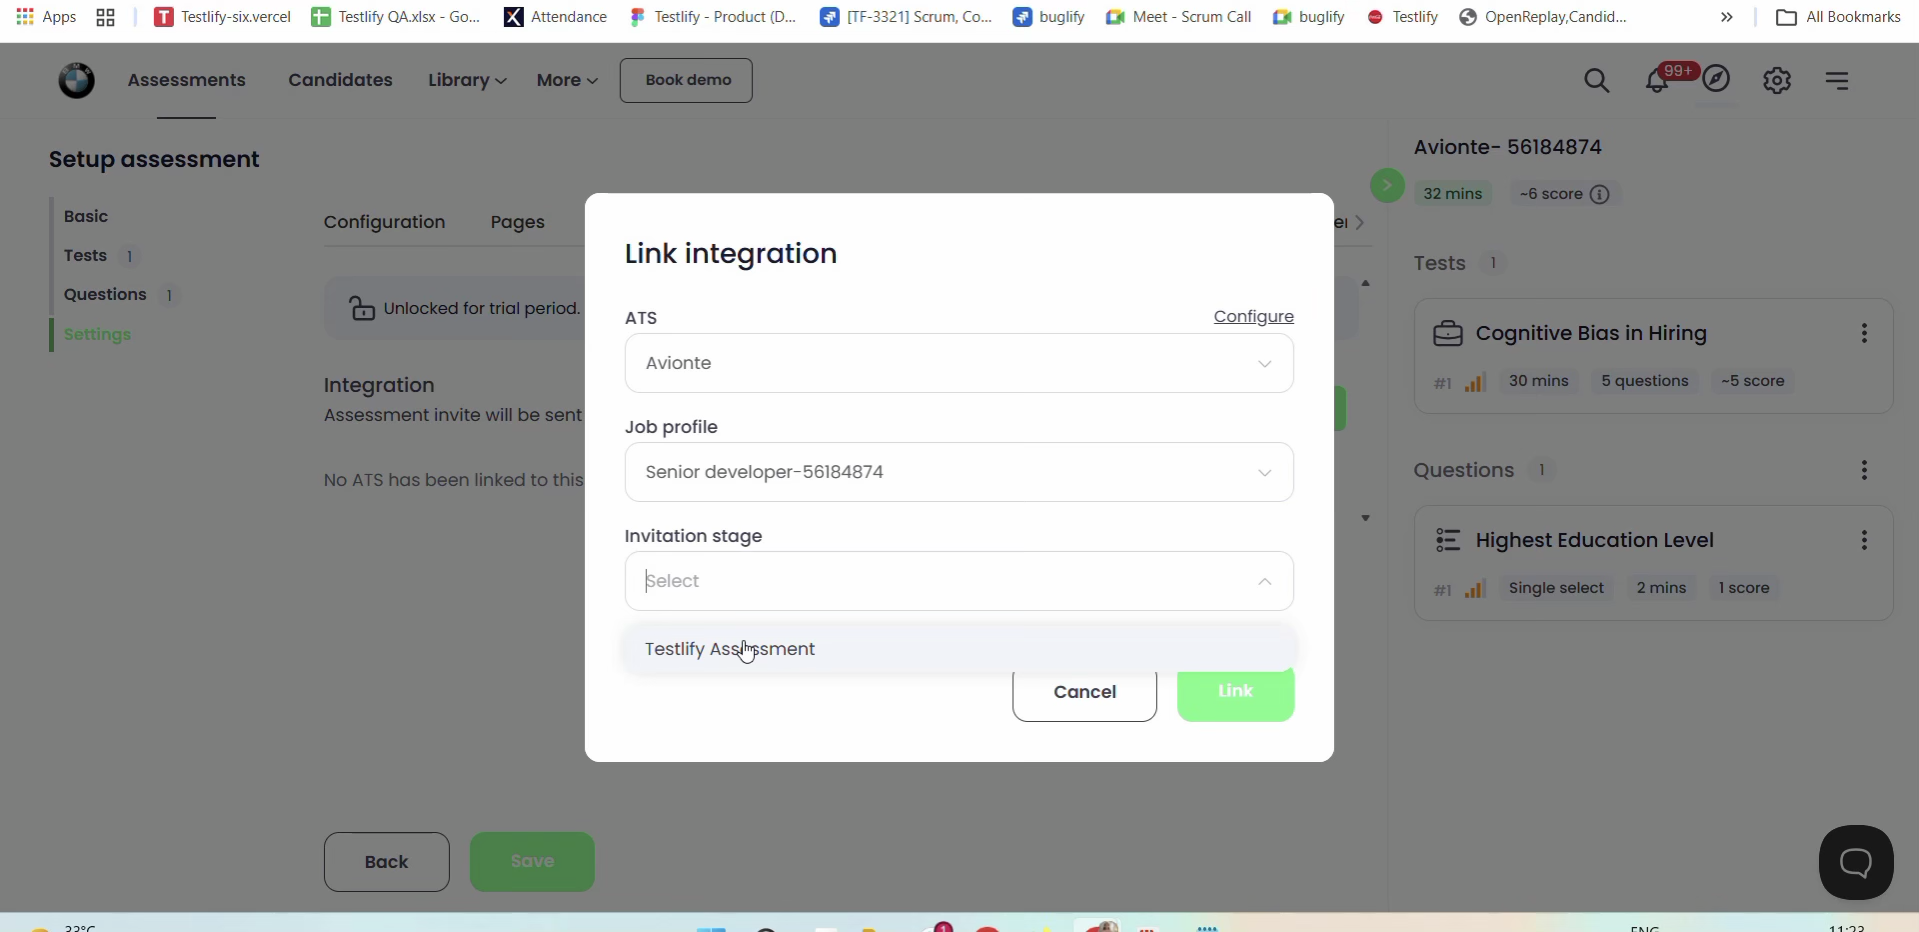
Select the matching Job profile and the Invitation stage that will trigger the invite.
Part 5 — Nominate a Candidate
With the job linked, add or locate the candidate in Avionté and nominate them to the job as usual.
- Go to Talent → Add New Talent to create a candidate record (or use Talent Search to find an existing one).
-
Open the job, go to the Nominate section, search for the candidate, and nominate them to the position.
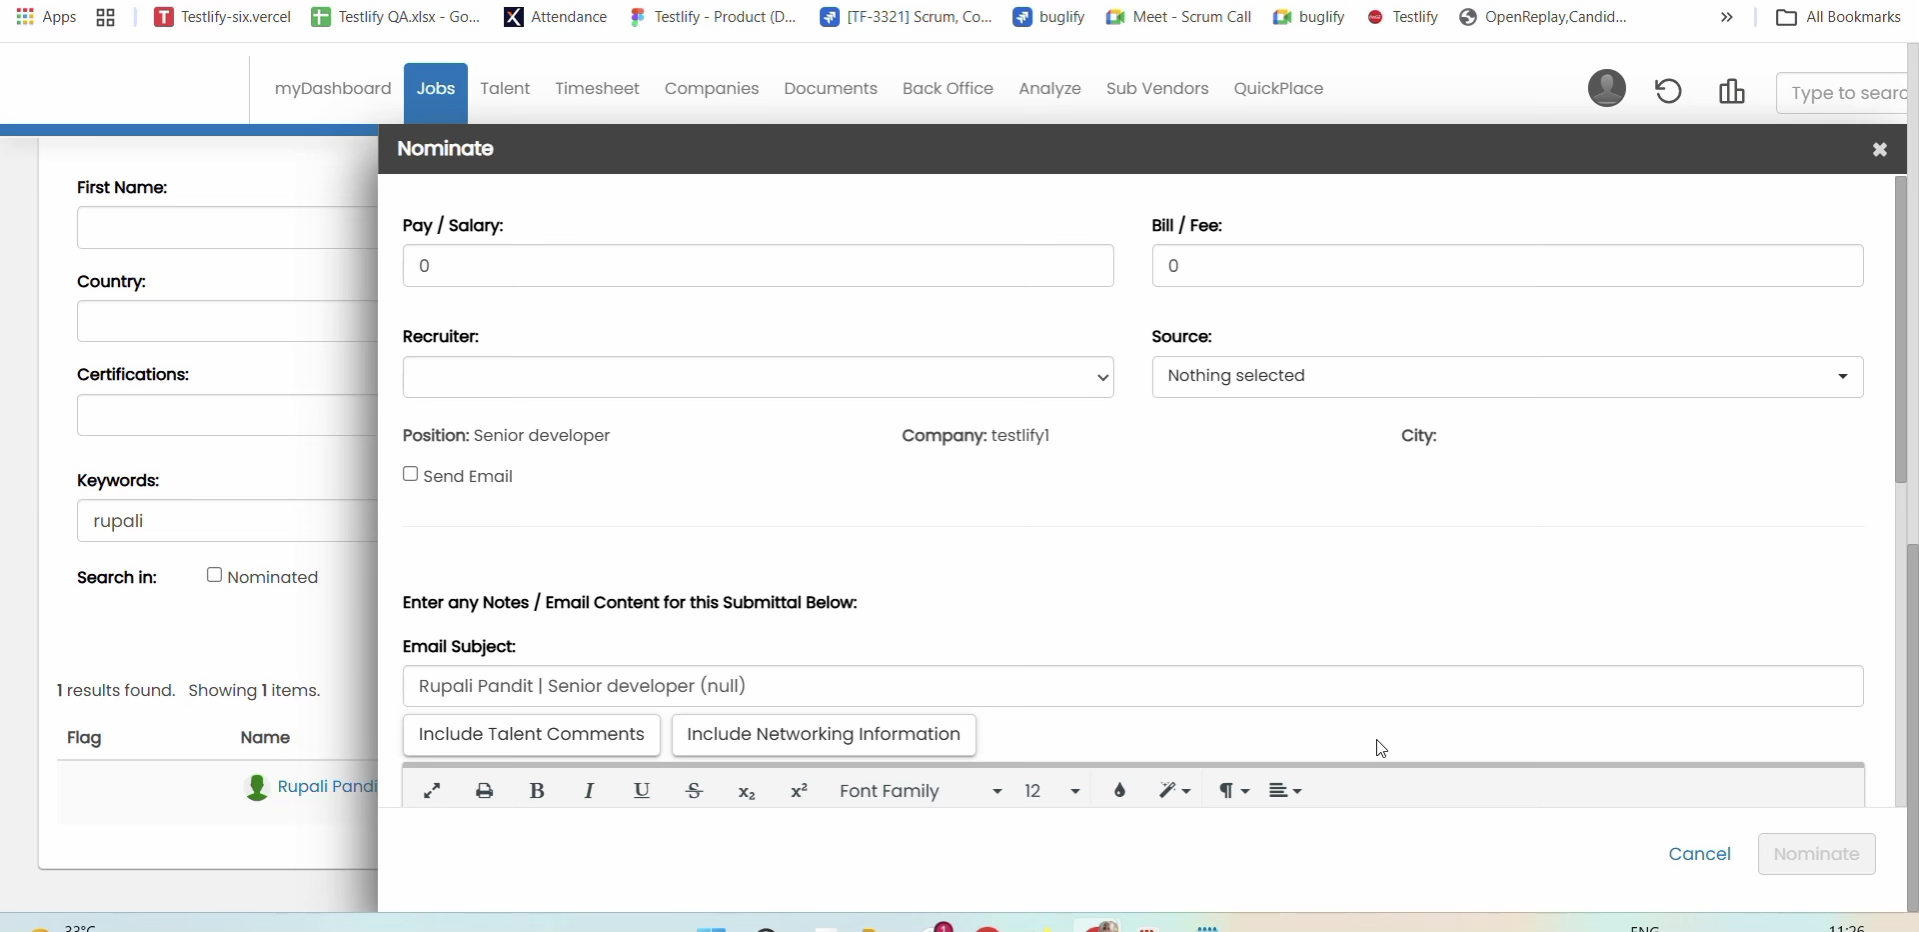
Nominating a candidate to the job — pay/bill rate, recruiter, and source details.
Part 6 — Trigger the Assessment
This is the step that actually sends the invite — everything before it is one-time or per-job setup.
- In the job's Nominated list, click the candidate's Stage dropdown.
-
Select the stage you linked in Part 4 (e.g. Testlify Assessment).
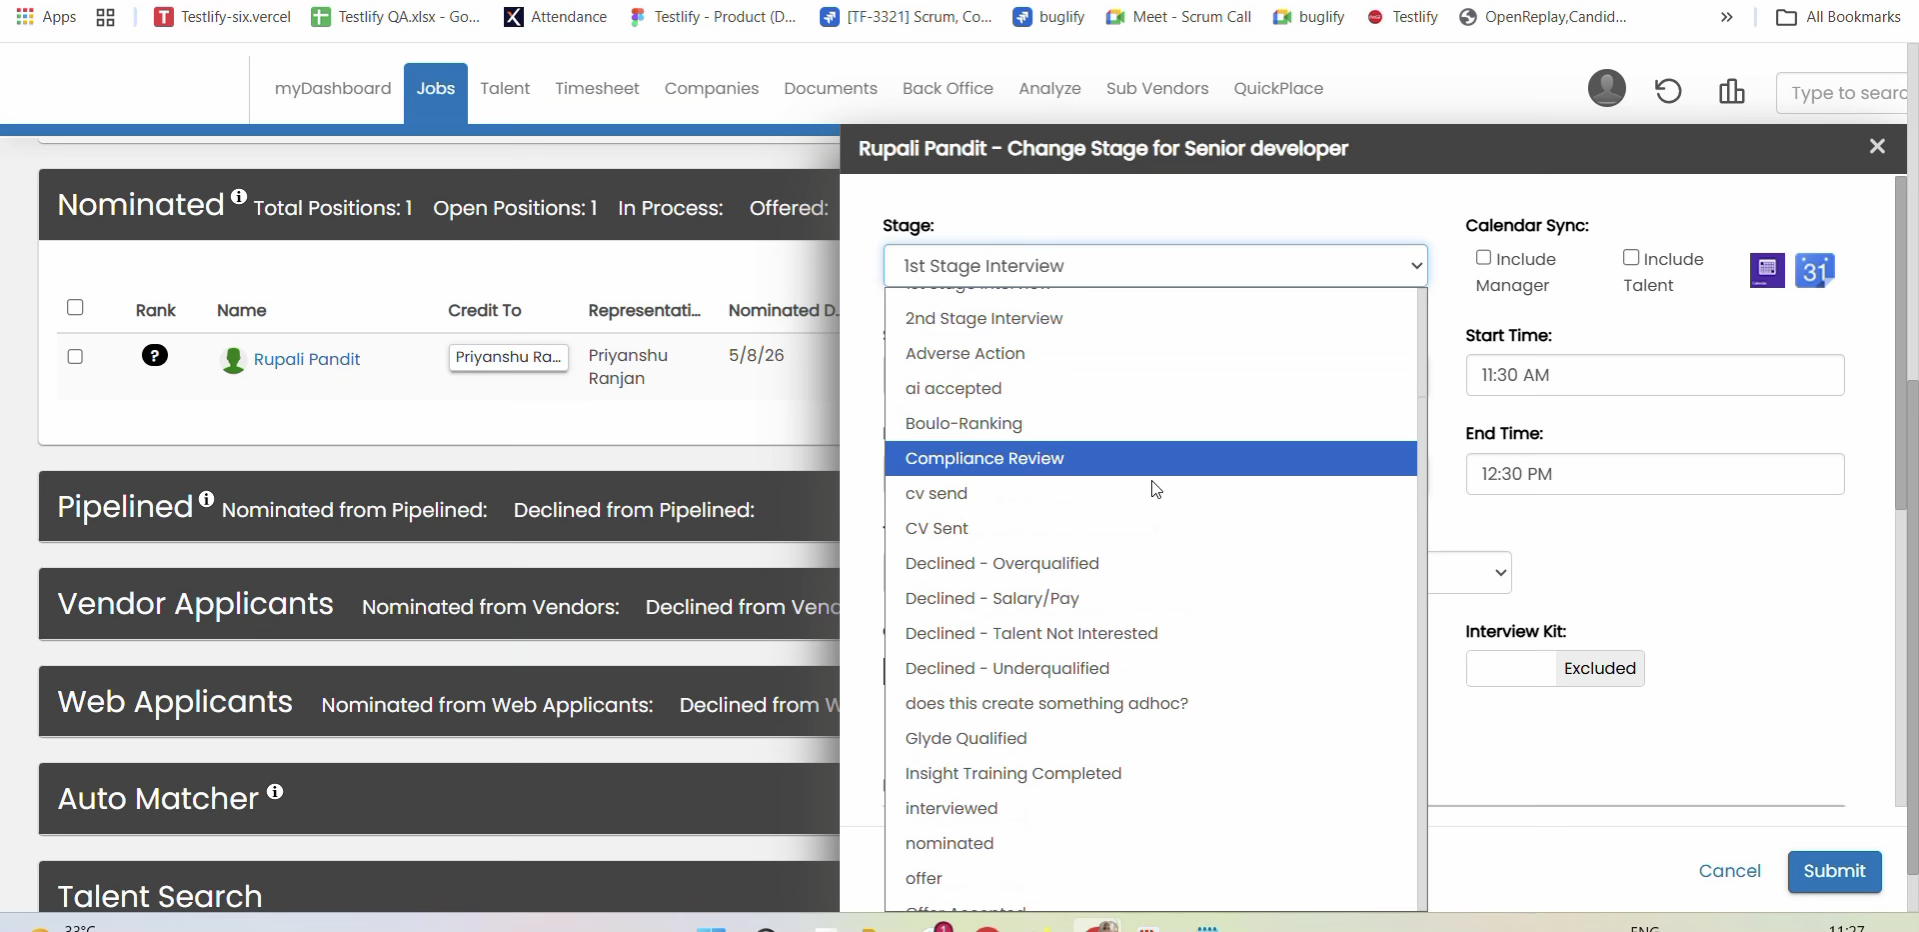
Changing the candidate's stage to Testlify Assessment sends the invite automatically.
- Testlify sends the assessment invite immediately — no action needed on the Testlify side.
-
You can confirm delivery by opening the assessment in Testlify; the candidate will appear with a status of Invited or Delivered.
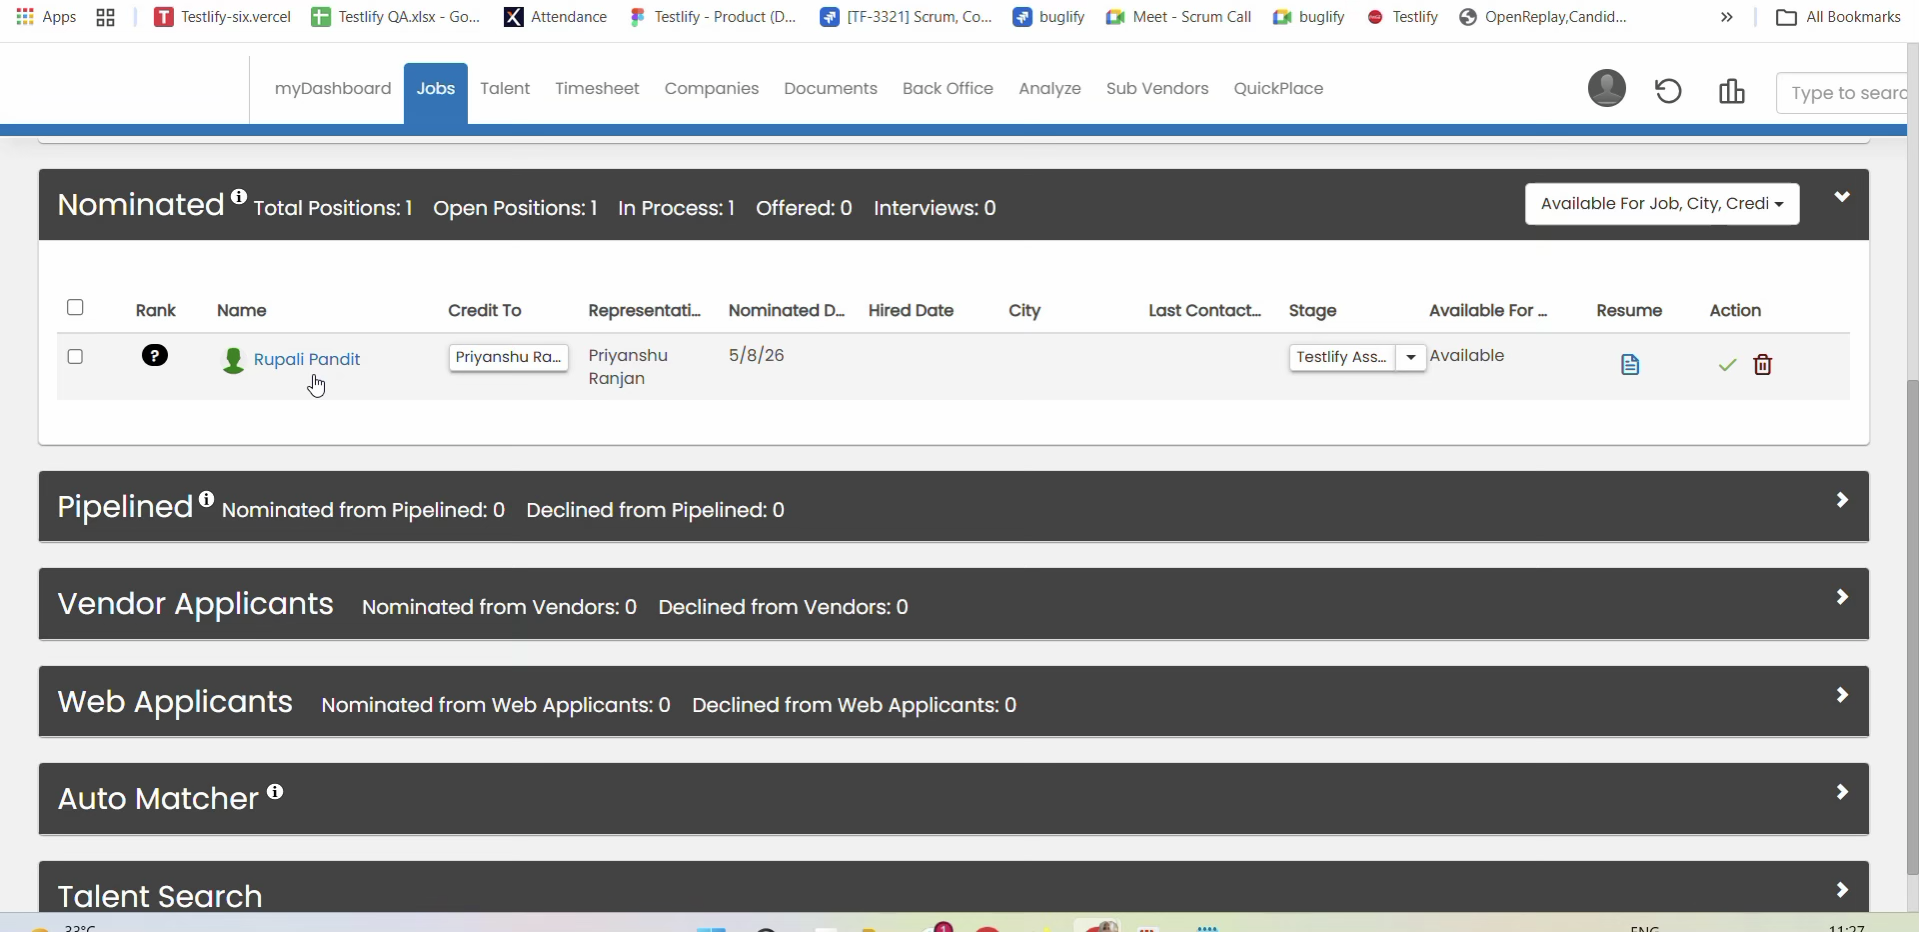
The candidate now shows under In Process on the job's Nominated panel.
Part 7 — Results Sync Back Automatically
Once the candidate completes the assessment, Testlify writes the results directly back onto their Avionté profile — no manual follow-up required.
- Open the candidate's profile in Avionté and go to the Activities tab.
-
A new Assessment activity appears automatically, logged at the moment the candidate finishes.
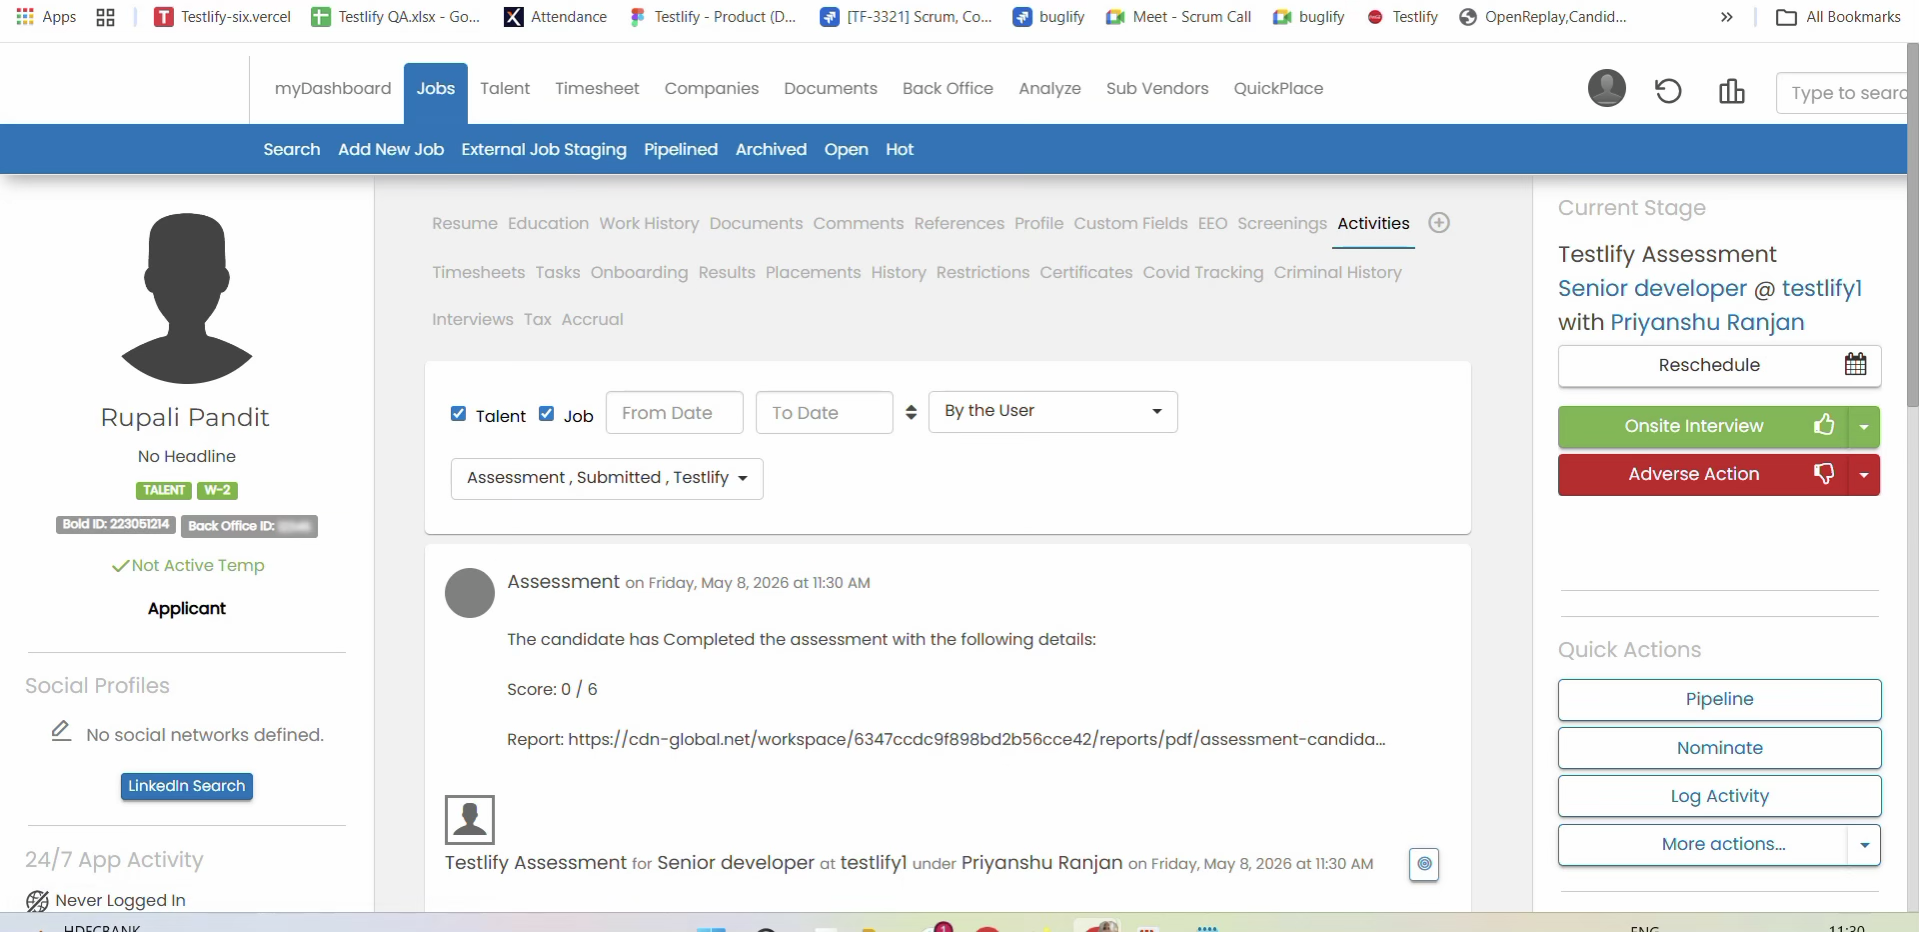
The Activities tab logs the score, completion time, and report link as soon as the assessment is done.
-
The logged activity includes:
- Total questions and score achieved
- Average percentage and total time taken
- A direct link to the full report
- The underlying Testlify Assessment ID, for reference
-
A merged PDF report is also generated, combining candidate details and the full assessment breakdown. You can open it directly or use Forward as Email from the activity log.
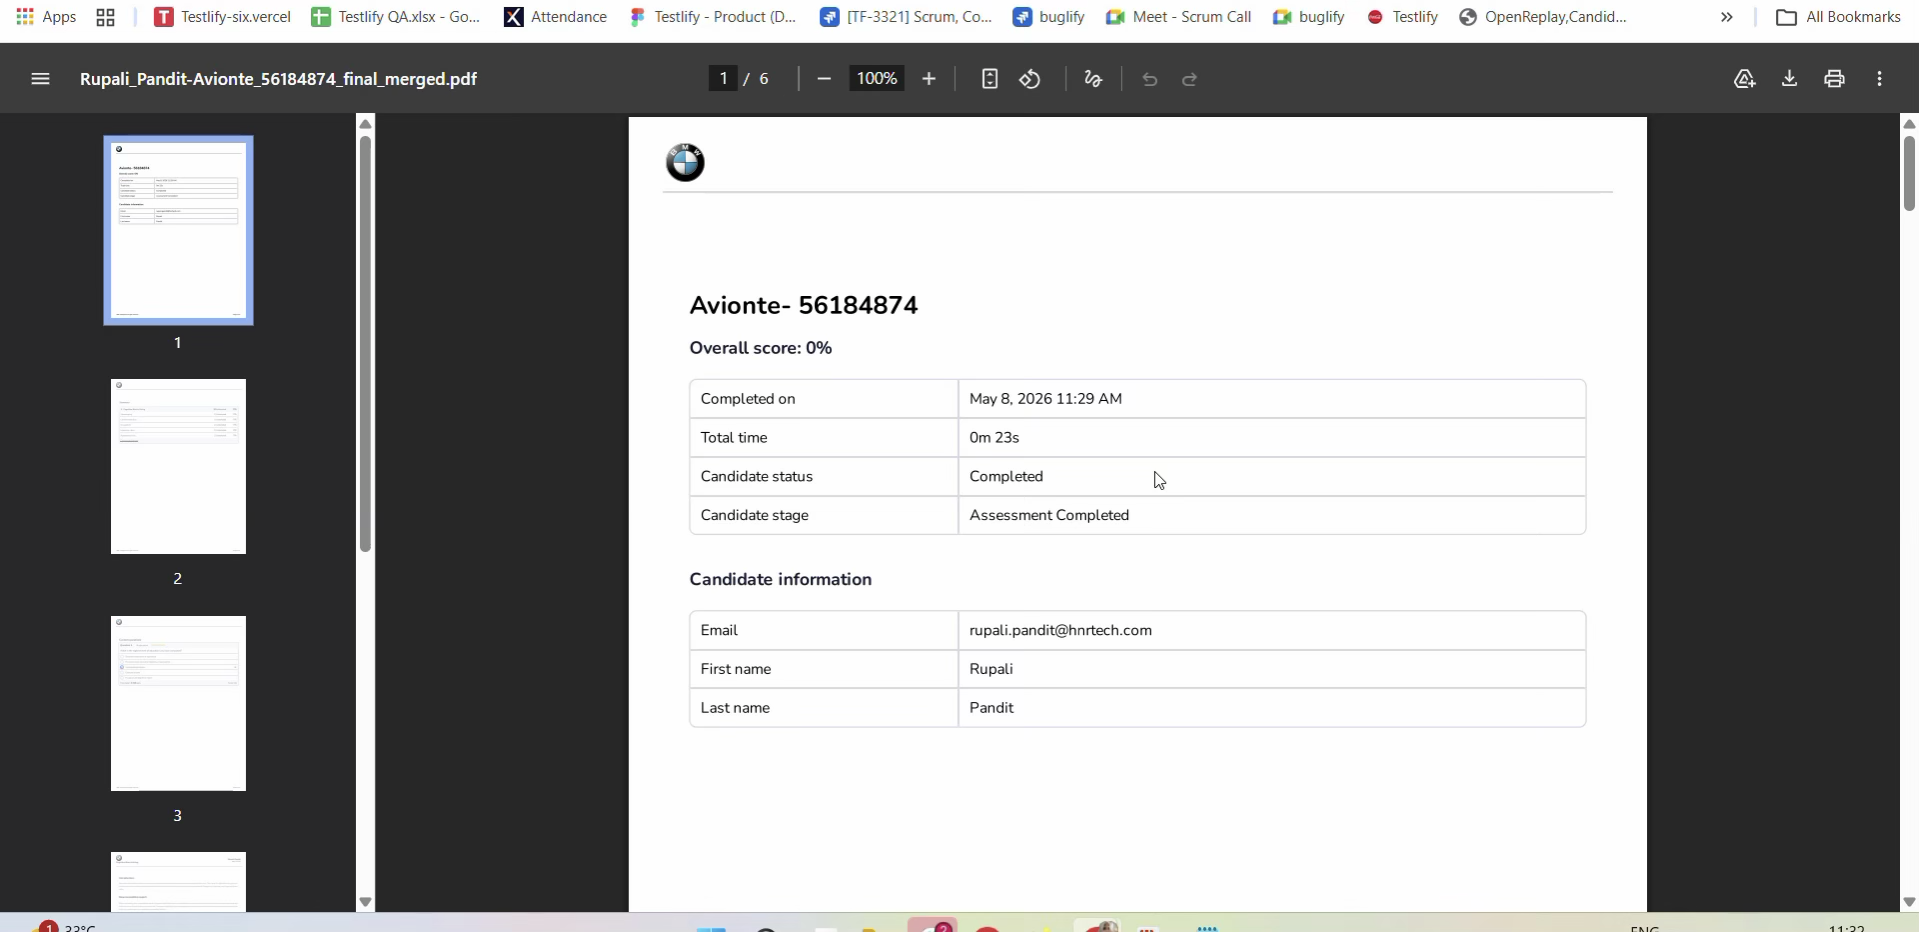
The auto-generated PDF report — overall score, completion details, and candidate information.
Quick-Reference Summary
| Action | Frequency |
| Connect Avionté → Testlify | One-time, admin |
| Create “Testlify Assessment” nominate stage | One-time, admin |
| Create & post a job in Avionté | Per role |
| Link job + assessment + stage in Testlify | Per role |
| Nominate candidate | Per candidate |
| Change candidate stage → sends invite | Per candidate |
| Score & report sync back to Avionté | Automatic |
Need Help?
If a candidate's stage change doesn't trigger an invite, double-check that: the job is linked to the correct assessment in Testlify (Part 4), the stage selected as the Invitation stage exactly matches the stage you moved the candidate into, and your Avionté connection still shows Active under Testlify's Settings → Integrations.
For further assistance, contact Testlify Support at support@testlify.com.