How to Set Up the Fountain Integration with Testlify
The Testlify–Fountain integration lets your hiring team send applicants from Fountain directly to Testlify for assessments and automatically receive results back — enriching candidate profiles without manual data entry. Using Fountain's Partner API (PAPI), candidates move seamlessly from Fountain → Testlify → Fountain, with status updates and data sync handled automatically.
Before you begin
- You have a Testlify account. If not, register here.
- Testlify has been enabled on your Fountain account. Contact your Fountain CSM or support@fountain.com to activate it.
Video Walkthrough
Step 1 — Get Your Testlify API Key
- Go to your Testlify Workspace and click the Settings icon.

- Click Generate key, then click Copy API Key.


Step 2 — Connect Testlify in Fountain
- In your Fountain account, click the account profile icon in the top-right corner.
- Click Integrations → Screening.
- Locate Testlify in the list and click Connect.

- Paste your API key into Fountain's integration settings.
- Click Save Changes to activate the integration.

- To confirm the integration, return to Testlify. Fountain Integration should appear under Integrations in Testlify Settings.

Step 3 — Add Testlify to the Workflow Editor
After connecting, add the Testlify Partner Stage to any job's Workflow Editor to route candidates automatically to their assessments.
- Navigate to the Workflow Editor for the job.
- Click Add Stage → Create a new stage.
- Select Testlify Partner Stage as the stage type and enter a title.

- Click Add Stage.
- Under Stage Option Type, select the Assessment to send to candidates.
- Click Save Changes to complete the setup.

Tip: You can reuse the same Testlify Partner Stage across multiple jobs — just select a different assessment for each job's stage to keep hiring pipelines independent.
Testlify Partner Rule Stage
Once a candidate completes the assessment, Testlify populates the following partner details on their Fountain profile.
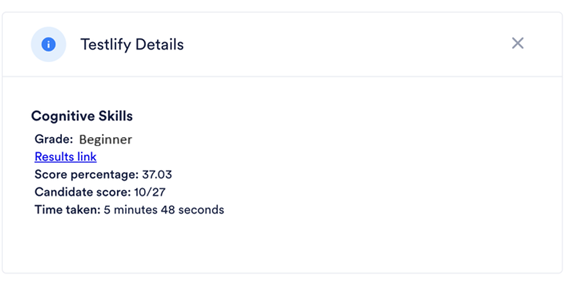
| Detail Key | Value Type | Description |
| Score | Percentage | A value between 0–100 representing the candidate's score percentage on the assessment. |
| Grade | String | The candidate's overall grade. Grades are configured on Testlify's Assessment Settings page. |
| Results | URL | Link to results on the Testlify Dashboard. |
| Note | String | A brief overview of the candidate's performance on the assessment. |
| Candidate score | String | The candidate's score in fraction form. |
| Time taken | String | Total time the candidate spent completing the assessment on Testlify. |
You can define Partner Rules based on these details. For example, automatically advance candidates who score above 25 to the next stage, or move them to Approved when their status is Completed.

To download a candidate's assessment report: click the Testlify Completed status, then click PDF Report.

Testlify Status Labels
During a candidate's lifecycle in the stage, Testlify updates the Partner Status as follows:
| Status Label | Description |
|
|
The candidate has been invited for assessment on Testlify. |
|
|
The candidate has successfully completed the assessment on Testlify. |
|
|
There was an error sending the invitation. Possible reasons:
|


Applicant Experience
When a candidate reaches the Testlify Partner Stage, they receive an assessment invitation by email. Once they complete the assessment, their results are automatically sent back to Fountain — enriching their profile with assessment data.
Need help? Contact support.