Testlify Product FAQs: Assessments, Workspace & Candidates
Get answers to the most common questions about Testlify — covering Assessments, Workspace settings, and Candidate management.
Before you begin
- Both Admin and Member roles can create assessments and invite candidates.
- Only Admins can deactivate (remove) team members from a workspace.
- Candidate deletion is permanent — download results before deleting.
Assessments
1. How do I create an assessment?
- Go to the Assessments tab and click Create New Assessment.

- Enter the Job Role and Assessment Name.

- Select the Tests you want to include.

- Add Custom Questions (optional).

- Review and configure Settings.

- Click Invite Candidates to publish and send the assessment.

2. How do I edit an assessment?
Note: Edits apply only to candidates invited after the change — candidates already invited are not affected.
- In the Assessments tab, click the three dots icon next to the assessment and select Edit.

- Update the Job Role or Assessment Name if needed, then click Next.

- Make your changes and save.

3. How do I copy an assessment?
Make a copy clones an existing assessment — including all tests, custom questions, and advanced settings. Edit the copy or invite candidates directly.
- In the Assessments tab, click the three dots icon and select Make a copy.

- Update the Assessment Name if needed, then click Make a copy.

- The copy appears at the top of your list as Copy of [assessment name].

4. How do I delete or archive an assessment?
Use Delete only before any candidates are invited. Once candidates have been invited, use Archive instead.
To delete (no candidates invited yet):
- Click the three dots icon and select Delete.

- Review the warning, then click Delete to permanently remove it.


To archive (candidates have already been invited):
- Click the three dots icon and select Archive.

- Review the confirmation, then click Archive.


5. How do I unarchive an assessment?
- In the Assessments tab, click the Active Assessments dropdown and select Archived Assessments.

- Find the assessment, click the three dots icon, and select Unarchive.


- The assessment returns to your active list.

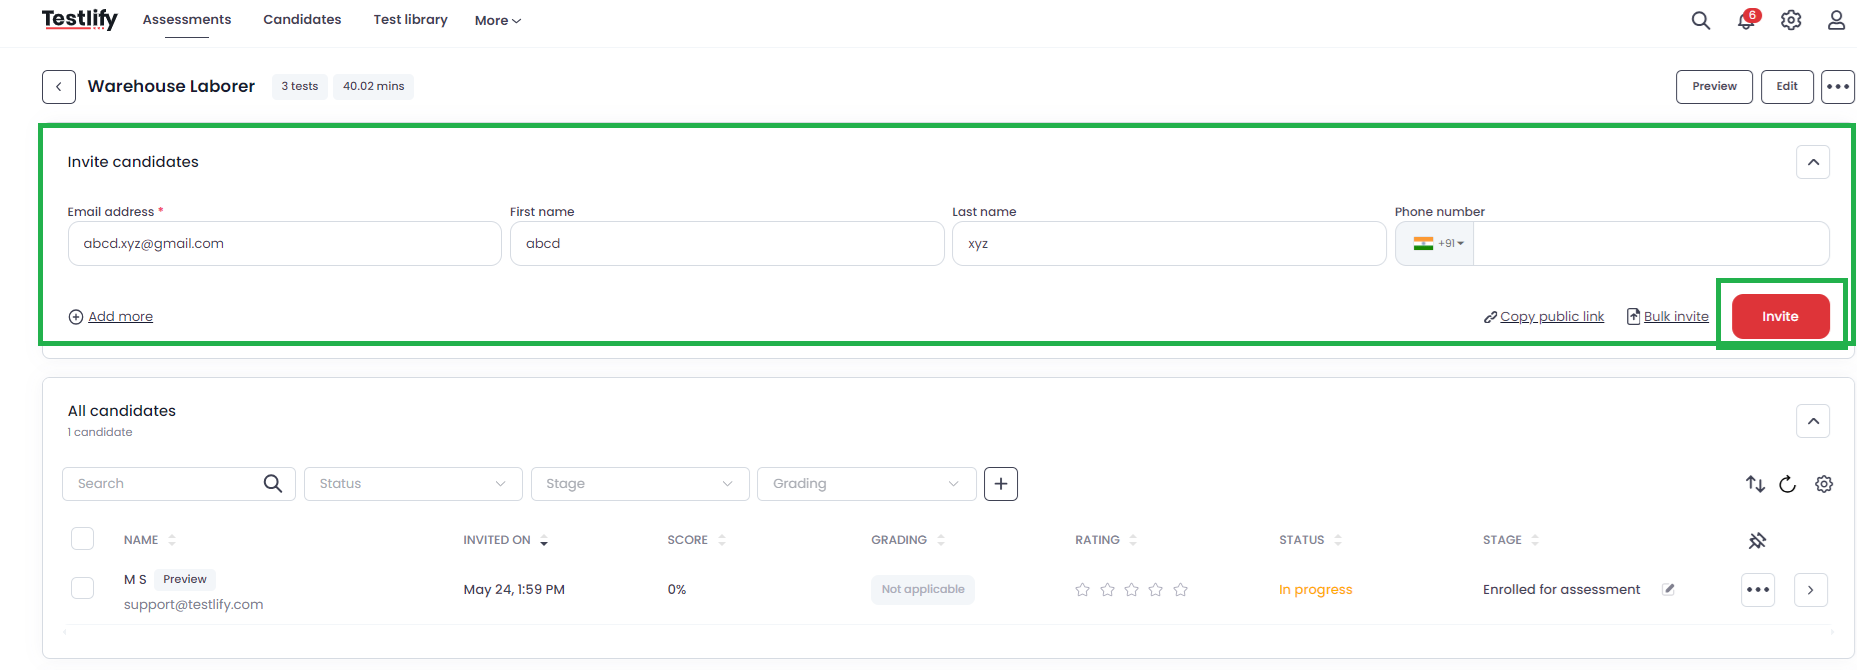
6. How do I invite candidates to an assessment?
Choose from three invitation methods:
- Individual email — Invite one candidate at a time by entering their details.
- Bulk CSV upload — Upload a CSV file to invite multiple candidates at once.
- Public link — Share a self-enrollment link in your job posting.
- ATS Integration — Connect your applicant tracking system to automate invites.
Individual email: Click Invite Candidates, enter the candidate's details, and click Invite.

Bulk CSV: Click Invite Candidates and upload a CSV file with candidate details.


Public link: Generate and copy the public link to embed in your job posting.


Workspace
1. What is the difference between Admin and Member roles?
Both Admins and Members can manage assessments and invite teammates. The key difference: only an Admin can deactivate a team member's workspace access. Members can add teammates but cannot remove them.
2. How do I add a team member to my workspace?
- Click the profile icon and go to Settings.

- Go to Users and click Add Member.


- Enter the team member's email address and select their role (Admin or Member).

- Click Add Member to send the invitation.

3. How do I remove a team member from my workspace?
Note: Only Admins can deactivate team members.
- Click the profile icon and go to Settings.
- Go to Users, find the team member, click the three dots icon, and select Deactivate.

- Click Confirm to remove the team member.


4. How do I download invoices?
- Click the Profile icon and select Billing & Invoices.

- Click Manage Subscription.

- Go to Billing History.

- Click the download icon next to the invoice you need.

Candidates
1. How do I delete a candidate's details?
Warning: Deletion is permanent and cannot be undone. Download any results before proceeding.
- In the Assessments tab, click the assessment name to open the candidate list.
- Click the three dots icon at the end of the candidate's row and select Delete.

- Click Delete again to confirm.


2. Can I reinvite a candidate to the same assessment?
Direct reinvitation is not supported. To have a candidate retake an assessment:
- Download the candidate's original results (strongly recommended).
- Delete the candidate's details (see above).
- Send a new invitation to the candidate.
Tip: The candidate will see the same questions on retake, which may affect their score. Always download results first.
3. How do I send a candidate's results?
Results can be sent to candidates who have completed the assessment — individually or in bulk.
Individually:
- In the Assessments tab, open the relevant assessment.
- Click the three dots icon next to the candidate and select Send assessment result.
Bulk (up to 10 candidates):
- Select the checkboxes next to up to 10 candidates.
- Click the Send Assessment Result (email icon) in the action bar above the candidate list.
Need help? Contact support.